
Welcome to part two of the tale of the Christmas fam scarf. The blog can be read in any order with no detriment to enjoyment. Here’s a sum-up of each.
Part one: The intro and the pattern. Describes how the pixel pattern was created, taking through from photograph all the way to pixelated blob.
You’re reading Part two: The actual knitting. This will be an account of what went into the actual knitting of the scarf, referencing some super helpful tutorials and putting them in the context of working from a pixel pattern.
Part three: ScarfParty - your solution to the pixel pattern problem will gleefully describe the pattern tracking app I found I had to make to follow the pixel pattern for my much more complex fam faces.
The materials
For no reason other than that I had some left over from a previous project and had knitted my test duck in it, I used aran/worsted weight wool for my fam scarf. And, for no reason other than that my mum had lent me hers for another previous project, I used 4.5mm aluminium needles.
 The aforementioned test duck.
I nipped out on my lunch break and got the wool for the final scarf from Loop in Islington, London. I ended up needing a bit less than eight 50g, 80 metre balls (four of each colour).
Finally, you’ll be grateful for a tapestry needle when you’re tidying up your loose ends.
Due to the unscientific nature of my choices in this area, I’m not going to be very good at convincing you whether you should follow my example or learn from its errors. I will tell you that my scarf weighs 366g and that it’s nice and thick and warm, which would be great if we were ever going to have a winter in the UK again. It’s about 7mm thick when it’s not being stretched. Personally, I think it turned out great.
The techniques
This blog assumes a bit of experience with knitting, or at least familiarity with the concepts of the knit and purl stitches. Not loads though, this is only really my fourth vaguely serviceable project.
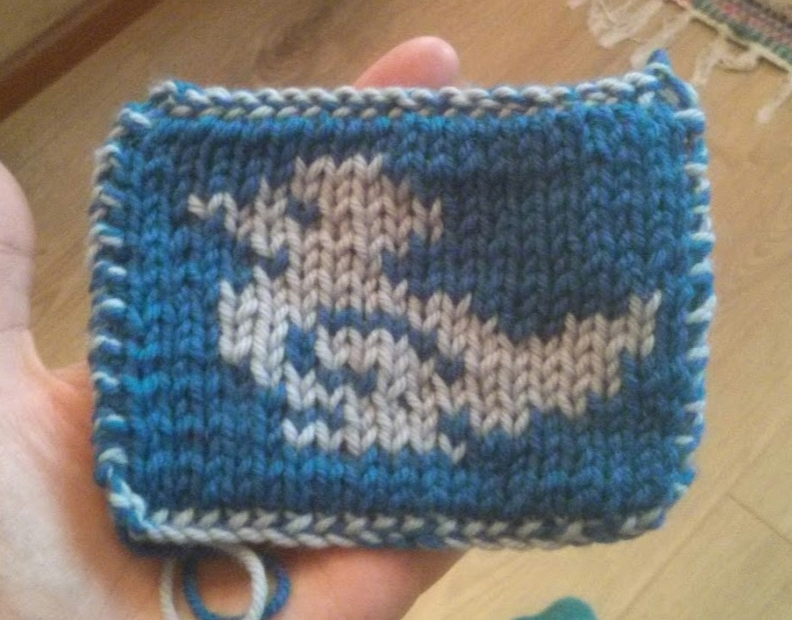
The technique I used to make the scarf lie flat and look scarfy on both sides is called double knitting or double-sided knitting. This basically involves knitting the two sides at the same time, knitting together the edges and borrowing colour from the other side for the design.
Recommended reading
I had a go at making a video tutorial myself and it was just so awful. Happily, youTube is positively bustling with eager knitting tutors, and this video by JoannesWeb absolutely smashes it. I actually learnt from a mishmash of various other videos and articles and only came across this one after my scarf was finished, but I think it’s the best video I’ve found. Highly recommended if you’re gearing up for your own double-sided scarf project.
From 0:09 to 0:54 she does a very nice cast on. From 0:56 to 6:24 she demonstrates how to do the first three plain rows. At 8:48 she shows how to bring in colour from the other side for creating designs.
Where I diverge/expand
There are a few things missing from the above video or things I did differently in the fam scarf that I wouldn’t want you to miss out on.
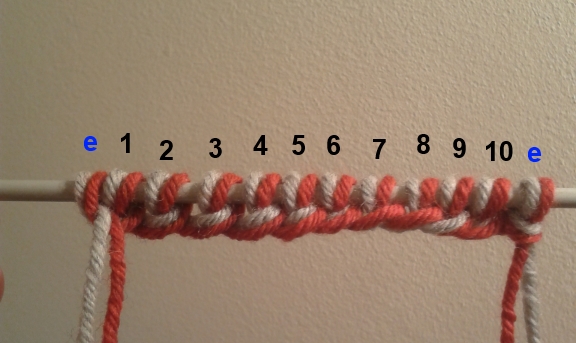
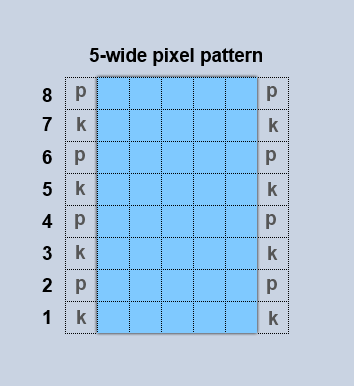
Casting on for your pixel pattern
We want to cast on two more stitches than the width of our pattern, giving us enough stitches to fulfil the pattern itself, and two for each edge. A cast on for a pattern 10 stitches wide might look like this:
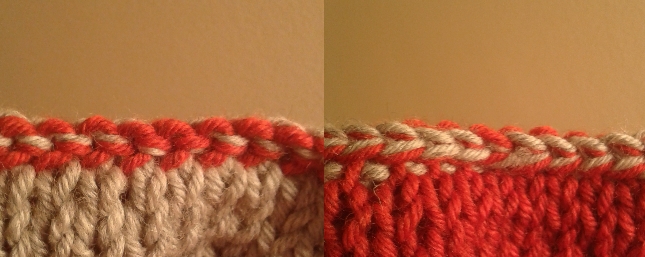
Alternative edges
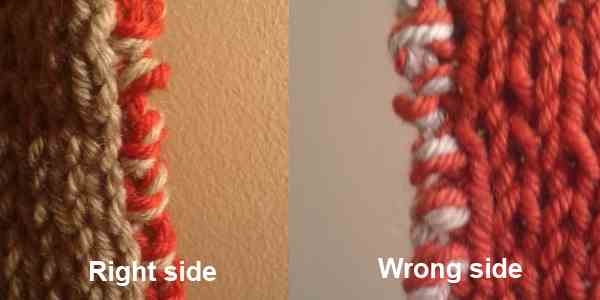
In the video, she starts and ends each row by knitting the double stitch (the light and the dark together) and never with a purl.
I started off doing this and found it creates this sort of serrated edge on each side:
On the fam scarf, I went for a slightly different approach, which is less visible on one side but creates some nice v shapes on the other:
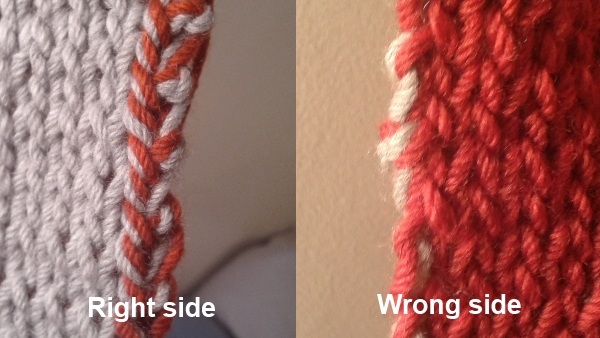
Of course, it’s down to personal preference, but if this edge style does appeal, achieving it is no more complicated. Simply knit together the edge stitches when the front side is facing you and purl them when the back side is facing you.
Another way of thinking about this is that you knit on the odd rows (the row counter starting at 1) and purl on the even ones.
Changing yarns
Just to save you some panicked googling when one or both of your first balls of yarn run out, here’s a video from KnitFreedom, which taught me how to change my yarn.
The cast off
I was pretty lazy with my cast off but it turned out fine. I just did a basic cast off, knitting the two stitches for each side together. So, following my cast-off approach for a ten-pixel-wide pattern, you’d cast off 12 stitches total. One for each of the edges, combining the yarns as per usual, and one for each pixel in the pattern, combining them to get both colours in the same stitch.
Tidying up your loose ends
Tidying up loose ends on a double knitted scarf is refreshingly easy. As we’ve sort of made a big, occasionally-connected pocket with our two sides, we can just use a tapestry needle to poke them into the middle. Magic.
Following the pixel pattern
The fact that our scarf is double-sided makes following the pattern a bit interesting, and I’ll go through an example here. The crucial factors are that, at the end of every row:
- The direction of the pattern is reversed
- The colours are reversed
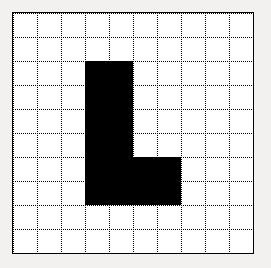
Here’s our pattern, which I knocked up in Pinta. (see part one for more detail on making pixel patterns). It’s 10x10 and I was originally intending it to be an L for Laurie, but, as you can see, it looks more like a learner driver plate.
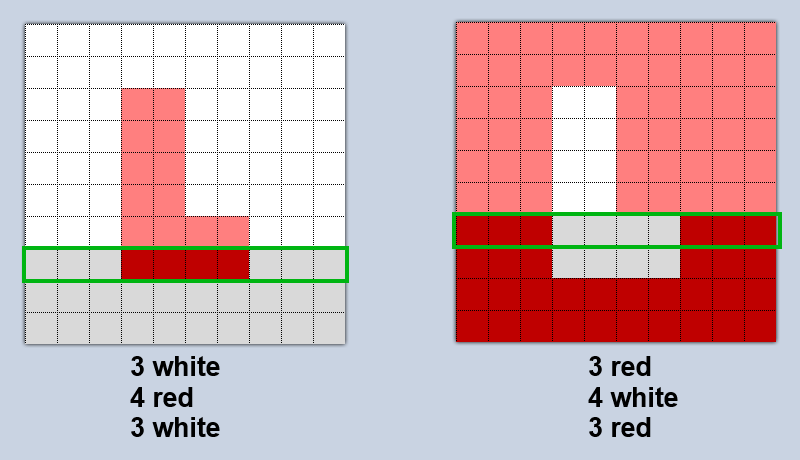
Let’s surrender to the automotive theme and pretend we’re using white and red wool. The first two rows are just block colour and are therefore pretty simple. We can easily visualise them in our heads like this. Remember that on each row the colours are reversed:
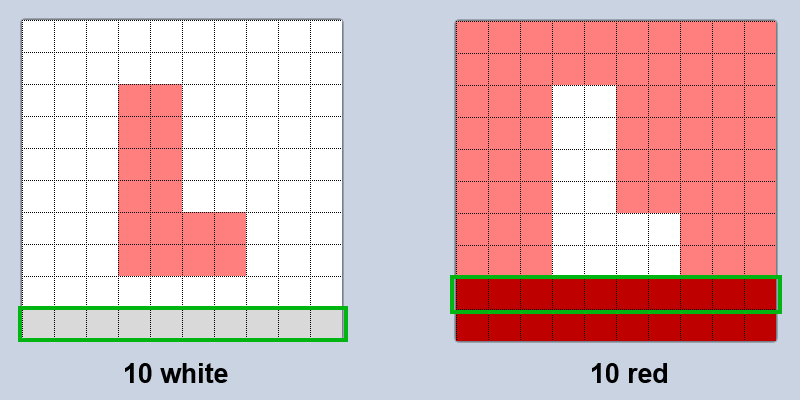
(Note that, as demonstrated in the tutorials linked above, when I say to knit a white stitch, I mean to knit a white stitch then purl a red one).
The third and fourth rows bring the beginnings of the design into our knitting, and again, without too great a feat of mental acrobatics, can be visualised as follows:
The fifth and sixth row get a bit more interesting, as these are the first rows that require us to think about reversing the design for the wrong side. Once again, done in your head, this might look like this:
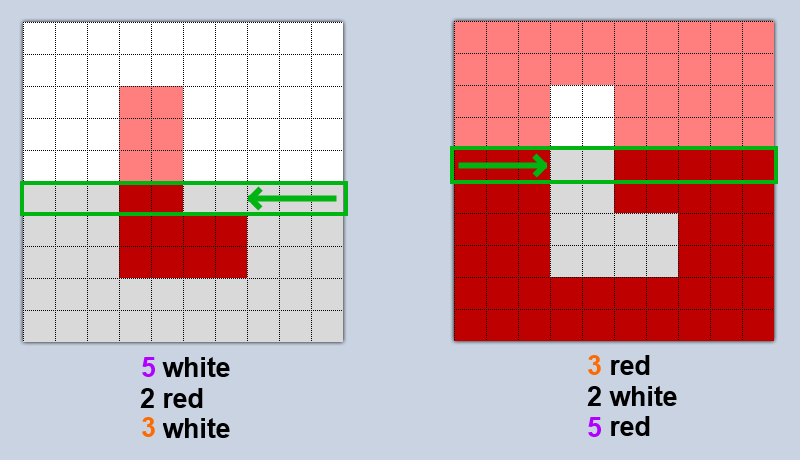
And that’s pretty much it! Obviously, rows seven and eight are identical to five and six respectively, and rows nine and ten mirror the first two. Cast it off, tidy in the ends, stick it on your toy car and admire a job well done.
Trickier patterns
For simple patterns, visualising this stuff mentally is easy enough. I got all the way through my test duck quite happily, and was even just about smiling as I worked my way through my knitted QR code experiment:
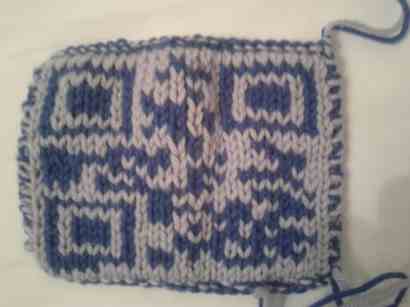 You’ll be surprised to learn that it didn’t work.
The first several rows of my first attempt at the fam scarf, however, were enough to convince me that I needed to rethink my approach to pattern following. With a complex pattern, it quickly becomes very hard to remember what row and stitch you were on, which colours you should be knitting, and which direction you’re following the pattern in.
Even more so when you’re on a phone you bought in 2011 for £150 sim-free (long story) and, no matter how far you try to zoom in, this is the best view of your pixel pattern you can get up in the pub:
![]() Oh god.
Oh god.
It’s for this reason that I invested time and enthusiasm in ScarfParty, my pixel pattern tracking web app. You can read all about the app, how it was made, and how you can use it for your own double-sided scarf projects in the next exciting chapter of the tale of the Christmas fam scarf.